Mad Scientist Time - Making Printed Circuit Boards
Tonight was the highlight of the project.... mix some chemicals up and make the board!
Once again here is the schematic that I going to work with. (There is a minor change
or two on the board layout but it is pretty minor.) The schematic is laid out using
TinyCad. (Free/opensource software)
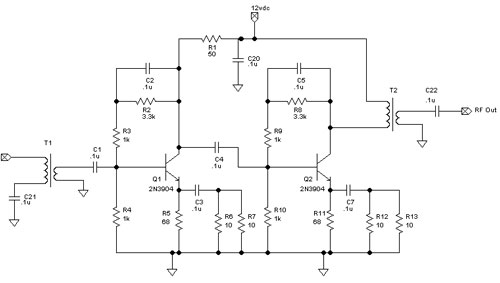
I found one or two minor issues with traces that I fixed after this image but this
is 99.5 what is on the board.
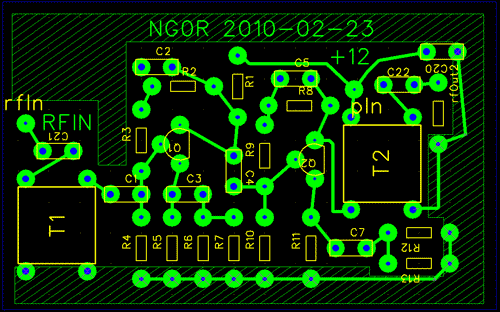
The board is laid out with FreePCB (Free/opensource). From FreePCB I export
the CAM files into the Gerber format. I open the Gerber file with Viewmate from Pentalogix
(inexpensive program.)
Tonight I took the project to the next level.
Steps:

Next set of steps:

Ok I have to admit that initially I was going to only use the GBC laminator to heat
the board & paper. It did NOT get the board to the 300F/150C that is needed to
refuse the toner. It appears that this model only runs to 110C until it is hacked.
I am researching that piece but it appears that you replace a resistor in the thermistor
feedback circuit circuit. I am still looking for more detail as it would be nice to
loose the IRON set in this process.
I removed the toner from the laminator only test and reran the process with the steps
listed above.
Additional notes:
73 de NG0R


Once again here is the schematic that I going to work with. (There is a minor change
or two on the board layout but it is pretty minor.) The schematic is laid out using
TinyCad. (Free/opensource software)
I found one or two minor issues with traces that I fixed after this image but this
is 99.5 what is on the board.
The board is laid out with FreePCB (Free/opensource). From FreePCB I export
the CAM files into the Gerber format. I open the Gerber file with Viewmate from Pentalogix
(inexpensive program.)
Tonight I took the project to the next level.
Steps:
I cut down a section of copper board & sanded the edges
I cleaned the board with a green cleaning pad and then rinsed it with acetone.
I printed out a template on the laser printer to register where the "print and peel"
needed to be taped down to go thru the laser printer.
I printed a mirrored image on the print and peel (taped to a 8.5" x 11" sheet of paper.)
I attached the small piece of "print & peel" paper to the copper board with
masking tape.
I put the board & paper under my iron for about 60 seconds moving the iron around.
I ran the board & paper thru my GBC laminator twice.
I put the board & paper under my iron for about 60 seconds moving the iron around.
I ran the board & paper thru my GBC laminator twice.
I put the board & paper in a container filled with water for a couple of minutes.
I removed it from the water & then removed the tape and paper.
Next set of steps:
I touched up any holes or questionable spots with a Sharpie marker.
Put on the chemical gloves & safety glasses.
I then mixed up the chemicals in a Pyrex (glass) container. 1 part 3% Hydrogen Peroxide
to 1 part Muriatic Acid.
(The Muriatic acid is "hydrochloric acid" that can be purchased at a hardware store
for $5 a gallon. It is used to clean pools, stone, car engines, etc. It is VERY strong
so be careful.) Add the acid to the Hydrogen Peroxide to make sure that you don't
have a run away exothermic reaction.
Drop the board in the Pyrex tray and agitate the tray every two minutes. (Warm chemicals
will make the process go faster.)
My first board took about 12-15 minutes. I could probably cut it in 1/2 with the etchant
at 100 degrees F.
Once the board is done rinse / soak the board in water while you clean up.
Pour the etchant into a plastic bottle (using a funnel) for reuse later for additional
boards.
Rinse the Pyrex tray, funnel, bottles, gloves, etc under running water. Rinse out
the sink REALLY well.
Remove the laser toner from the board with Acetone and a rag.
Ok I have to admit that initially I was going to only use the GBC laminator to heat
the board & paper. It did NOT get the board to the 300F/150C that is needed to
refuse the toner. It appears that this model only runs to 110C until it is hacked.
I am researching that piece but it appears that you replace a resistor in the thermistor
feedback circuit circuit. I am still looking for more detail as it would be nice to
loose the IRON set in this process.
I removed the toner from the laminator only test and reran the process with the steps
listed above.
Additional notes:
My first board has .020" traces with .120" pads. Since I am going to drill this with
a small press I figured that I should make sure that I leave myself enough pad to
work with. This board is only a single sided copper board.
I was worried that some of my traces would be undercut with the etchant. It was not
an issue. I could easily have worked with .010" traces.
The process worked well enough that I could have used pin registration and two sheets
of paper to make a double sided board.
I am now comfortable enough with TinyCad and FreePCB that I could crank out a schematic,
board layout, and Gerber files for small/basic projects in an evening +/-.
73 de NG0R